Browsing Category

DIY

before & after, decorating, DIY

Before & After: The Stenciled Entryway
Throwback Thursday

05/21/2015

Before & After: The Stenciled Entryway

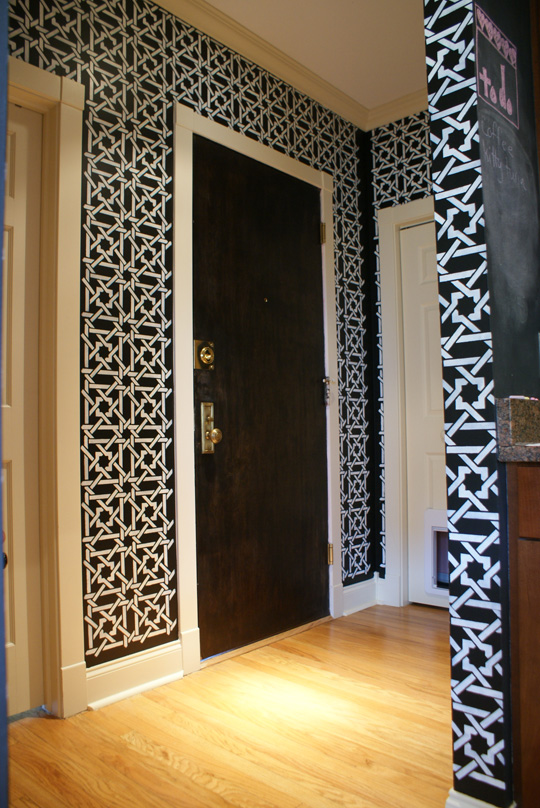
We haven’t been making very fast progress at This American House, so I’m digging back into our photo archives and seeing how the city apartment has evolved over the years. First up is my favorite room in the apartment. Which, actually, isn’t a room at all. Even five years after stenciling it, the teeny tiny little entryway still is my favorite space.

Stenciling the Entryway

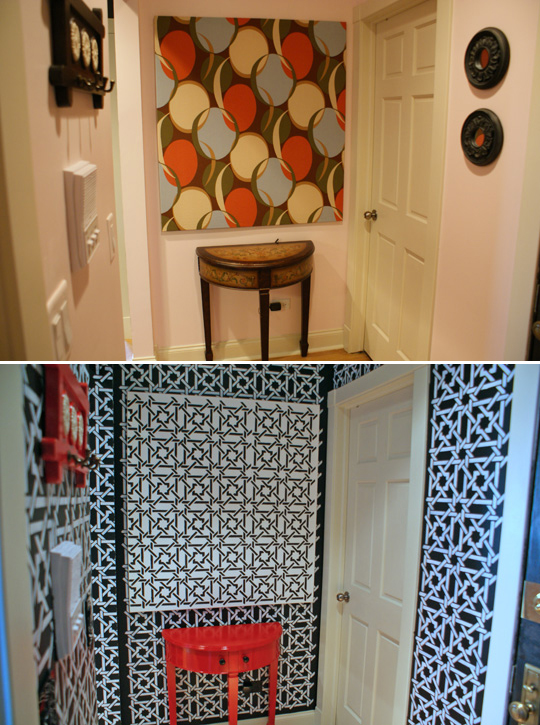
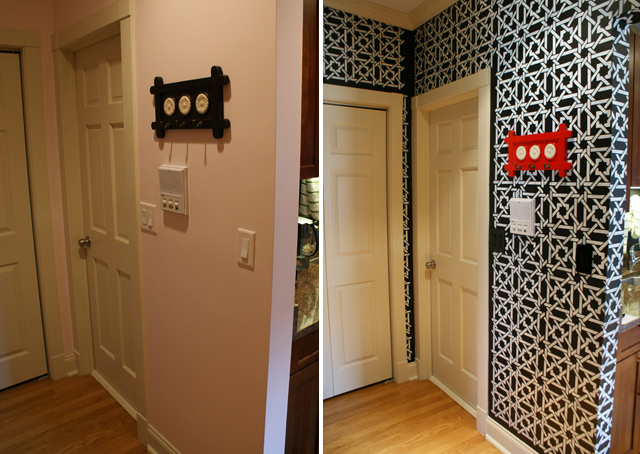
When we first moved into the apartment I painted everything in cool pastel colors. I don’t know, I guess I was feeling very mellow or something. The entryway got a few coats of pale pink that seemed like a good idea at the time. And then I quickly grew tired of it. So I did a complete 180 and went from pale pink to black and white.

5159240843_a891c74ba8_o

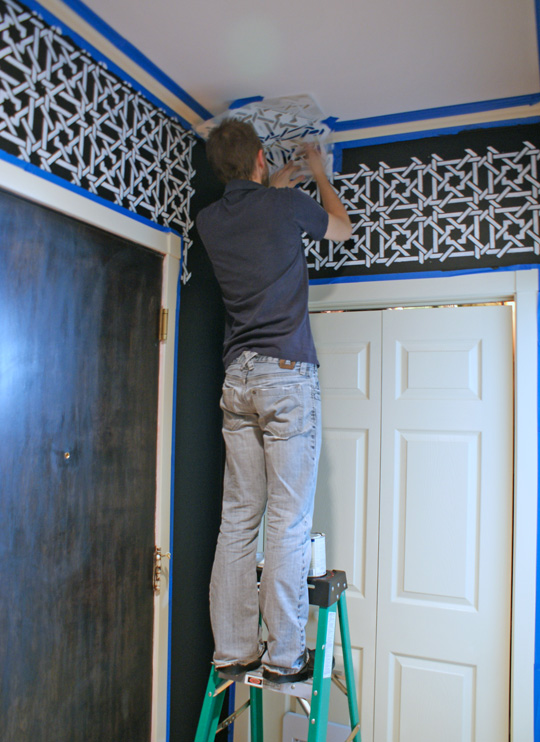
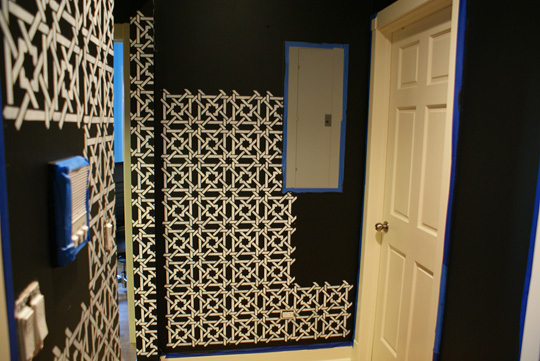
Painting the entryway black was a giant leap of faith. I mean, there’s nothing like taking a space that’s 2 feet by 4 feet and painting it a really dark color. I had a what-have-I-done moment when I stepped back and looked at the black walls before me. Once the stencil started going on, however, I could immediately see that I was doing the right thing. Whereas the black walls made the small space feel dark and claustrophobic, the addition of the white pattern opened it all up and actually makes the space feel bigger.

The Stenciled EntrywayI was able to reuse the existing furniture and accessories in the space. I painted the table and coat rack bright red to allow them to stand out from the patterned walls. (These are the only things that I’ve tired of over the years. I’d like to replace those red accessories with white ones.) I even repurposed the canvas that hangs over the table and hides the electrical box. I applied white fabric over the canvas and then used black paint to apply the stencil, creating a negative effect of what’s on the walls.

Black and White Stenciled Entryway

This little entryway is the first thing that people see when they enter the apartment and it always gets a reaction. Whether it’s a friend dropping by to visit or a delivery driver bringing us food, their eyes usually widen as they look up and down the walls. “That’s really nice wallpaper,” they’ll usually say. “Oh, it’s a stencil actually,” I’ll proudly inform them. “Wow, that must have taken forever,” they’ll reply.

Yes, it did. It was a long, painstaking process that left my arms sore. And it was worth every minute.

Images: This American House


Warning: Undefined variable $post in /var/www/html/wp-content/plugins/hemlock-core/inc/social_share.php on line 22

Warning: Attempt to read property "ID" on null in /var/www/html/wp-content/plugins/hemlock-core/inc/social_share.php on line 22
DIY

Real Life Lessons: Embracing the Imperfections of DIY

02/02/2015

Embracing the Imperfections of DIY

At my day job last Friday we had a Super Bowl potluck party. My contribution was this plate of bacon cheddar biscuits.

“Gee, Jason,” I can hear you asking. “Why are your biscuits two different colors?”

Oh, you noticed that, did you? Well there’s a simple reason some of the biscuits are darker than the others: I burned them. In an attempt to multi-task Thursday night, I was ironing clothes, listening to music and telling The Mister some sort of riveting story. My first batch of perfectly golden biscuits was cooling on a wire rack on the counter and the next batch was baking in the oven. I guess I was so distracted that I didn’t hear the over timer beep. Five minutes later, I caught a whiff of my biscuits starting to burn.

As I pulled the dark brown biscuits out of the oven, I spat out a few curse words and considered dumping them in the garbage. Before I did, I picked one off the baking sheet and bit into it. While the biscuit was a little crunchier than I would have liked, it still tasted fine.

“Here,” I said as I thrust a biscuit in The Mister’s direction. “Do you think I can still take these to work tomorrow?”

“Sure,” said The Mister between bites. “They taste fine to me. And isn’t that what really matters – how they taste and not how they look?”

“That’s true. But I hate showing up with a burned biscuits. I have a reputation as a good cook to uphold!”

It wasn’t until I was placing the biscuits in a container for their journey to the office that I finally decided that the burned biscuits were just fine. In fact, I finally reasoned, that the biscuits are burned is proof that they’re homemade versus store bought. When things are homemade, sometimes they’re imperfect.

And that’s the nature of doing it yourself. Sometimes things go wrong and you just have to deal with it. Whether it’s burning the biscuits or discovering that the faucet you just installed is a little too heavy for your stainless steel sink, life as a DIYer is full of surprises. It’s how you deal with those surprises that defines you as a maker. You can either say, “I suck at this! I’m never doing this again!” Or, and this is the path I recommend, you can say, “Oops, that didn’t work out so well this time. I’ll remember this lesson and really kick some ass next time!”

For the record, the biscuits were a hit.

Image: This American House


Warning: Undefined variable $post in /var/www/html/wp-content/plugins/hemlock-core/inc/social_share.php on line 22

Warning: Attempt to read property "ID" on null in /var/www/html/wp-content/plugins/hemlock-core/inc/social_share.php on line 22
DIY, renovation, stripping paint

Adventures in Stripping: Refinishing Fireplace Brick

01/12/2015

Adventures in Stripping: Refinishing Fireplace Brick

We’ve had an ongoing debate for the past year about what we should do with the fireplace. The bricks had been painted white some 30+ years ago and then the most recent owners painted the fireplace a glossy dark gray. We knew we didn’t want the gray but we weren’t sure whether we wanted to tackle the monumental task of stripping the fireplace either.

Finally one evening, in a stab at decisiveness, I grabbed a can of white paint and a brush. “I’m just going to paint the fireplace white,” I told The Mister. “And then we can decide what we want to do later.”

I painted two whole bricks before I reconsidered what I was doing. If we’re going to do this, we may as well do it right. I wiped off the wet paint, grabbed a bottle of Citri-Strip
and, well, now there’s no turning back.
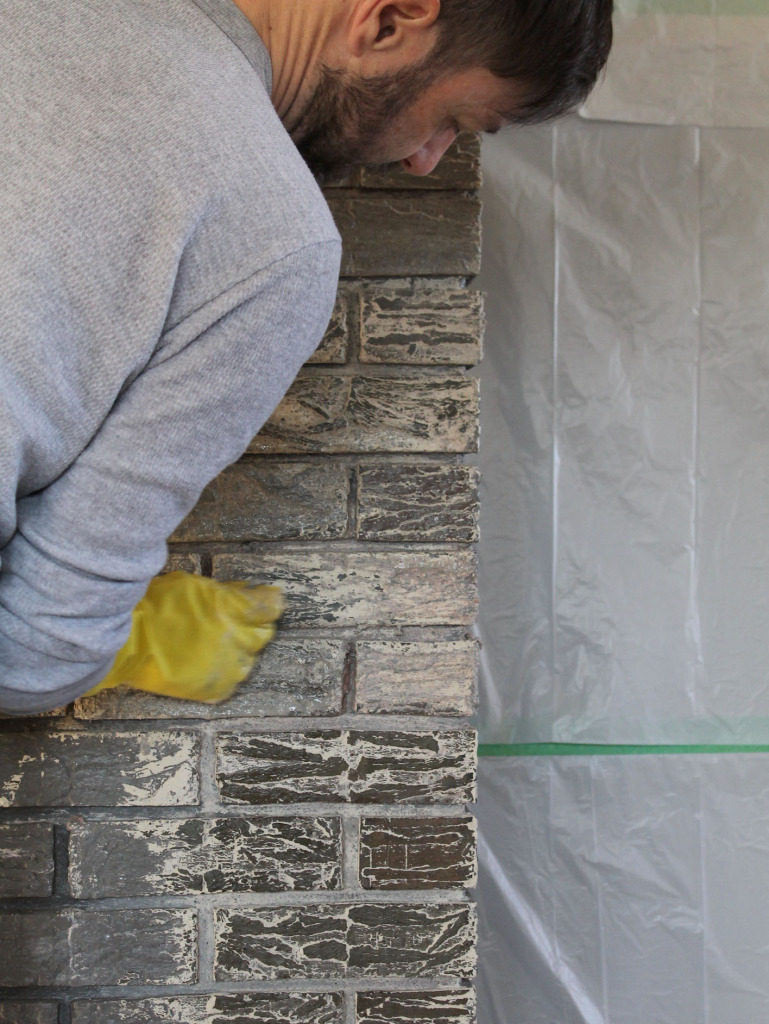
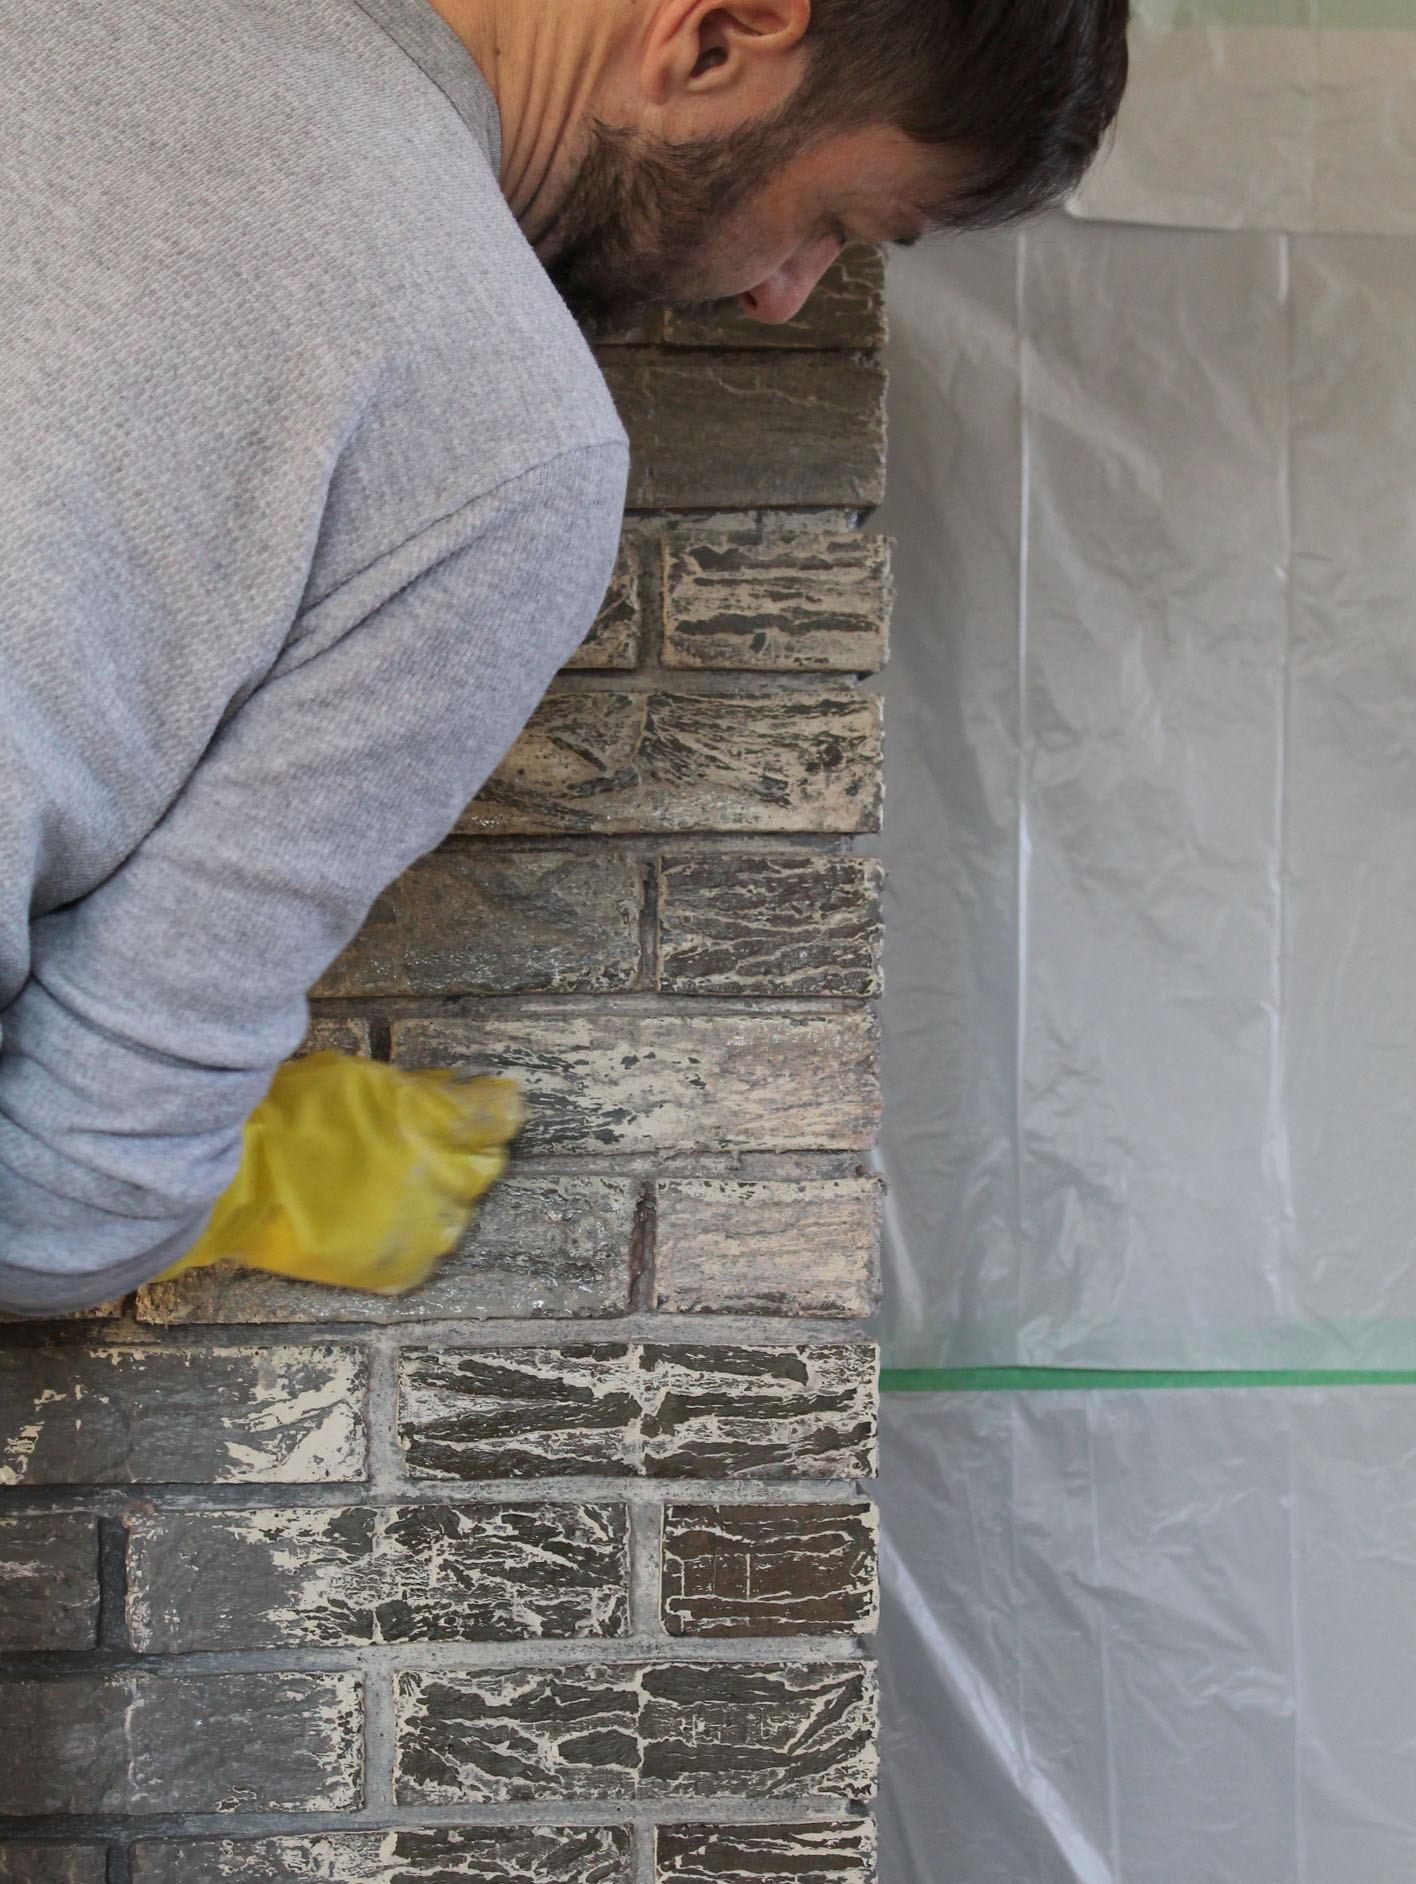
Stripping Fireplace Brick

At first, the project was going really well. The small section where we first applied the stripper was looking incredible. The dark gray paint peeled away quickly and with some scrubbing and brushing and lots and lots of stripper, the white paint washed away to reveal beautiful bricks. The bricks are not the dark red that we were expected but where instead shades of gray and blue and brown.
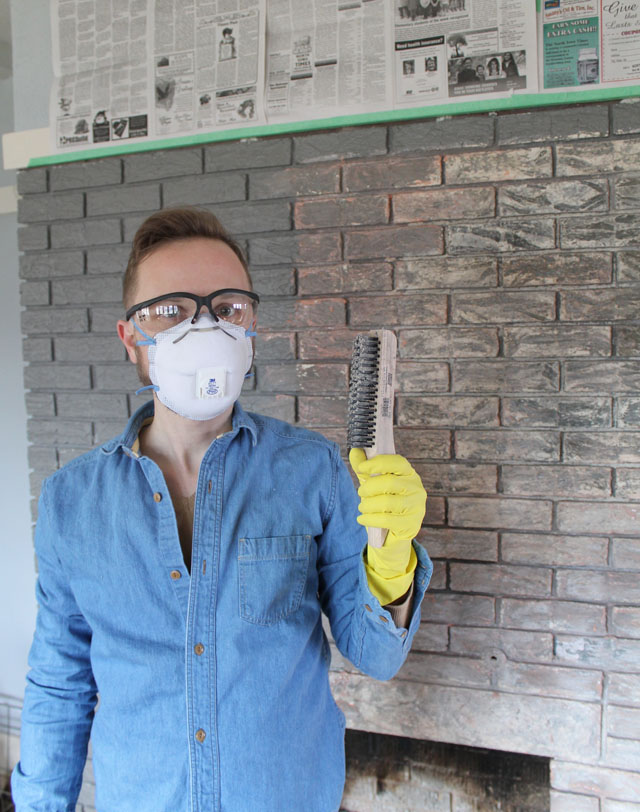
011115-stripping-fireplace-brick05

Buoyed by the success of the first few bricks, we decided to forge on. And so on New Years Eve, while others were donning party hats and festive attire, we were dressed in grubby clothes and rubber gloves. We taped garbage bags to the walls and floor and proceeded to cover the entire front of the fireplace with stripper. And that, as it turns out, was not a very good idea.

You see, stripping a small section of a dozen or so bricks seems completely doable. Scrubbing the entire surface of a fireplace over a twelve hour period seems like some sort of torture.
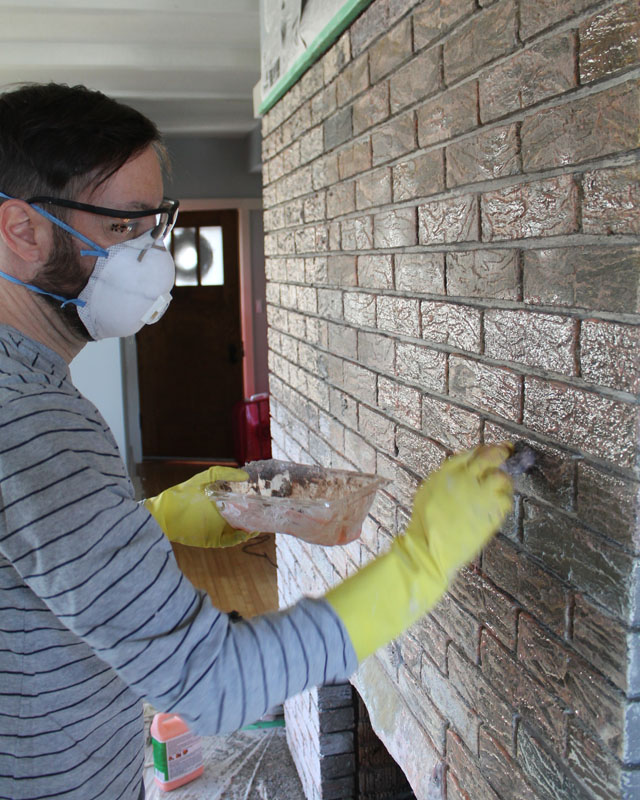
Applying Citri-strip the fireplace brick

Still, it was great seeing the progress as we went along. Slowly (ever so slowly) the gray and white paint would chip away and we would expose more and more beautiful old bricks. But oh the mess that it created! Even with the plastic bags lining the floor, we still ended up tracking little bits of paint and stripper all around the house.
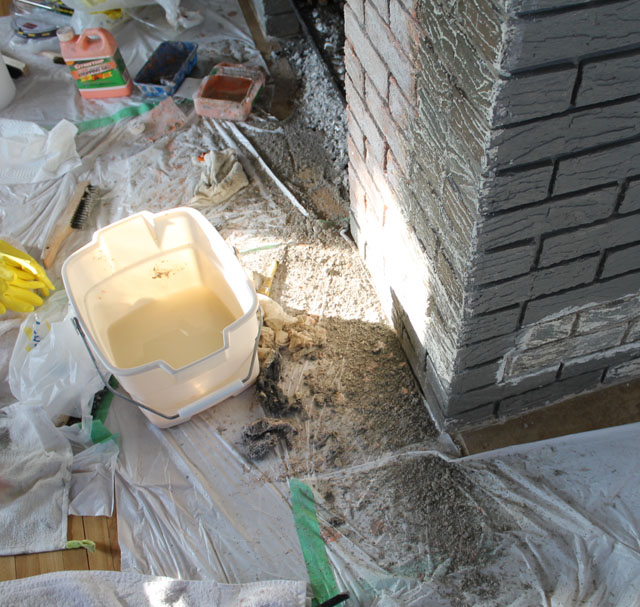
The mess of stripping the fireplace

At one point we had four wire brushes, a half dozen steel wool pads, two buckets of water, a pile of wet and dry rags and a few sponges at work. Here’s a little overview of our process.

Step 1: Use a steel wool pad to apply a layer of citri-strip to the brick. Let it stand for about an hour.

Step 2: Use another steel wood pad to apply another layer of citri-strip. This would essentially wipe away the gray paint, which would reveal the white paint. By applying another layer of stripper, we were hoping to make removal of the white paint a little easier.

Step 3: After letting the second layer of stripper sit for a few hours, we used wire brushes of various sizes to scrape away remaining paint. Talk about labor intensive! And oh the mess!

Step 4: Wash the brick with clean water.
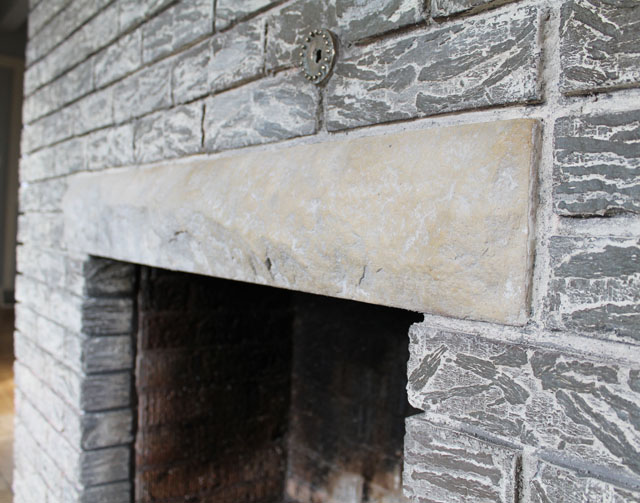
011115-stripping-fireplace-brick12

Every hour or so we would stand back and admire our work. And by admire I mean we would question our sanity and try to give ourselves pep talks about the progress we were making. But, truly, we were making progress, even if it did feel like it was at a snail’s pace.

By 10PM on New Years Eve, we had worked on the front of the entire fireplace for more than twelve hours. Some parts of it looked amazing while others obviously required more work. Sometimes you have to know when to say when, however, so we cleaned up our mess and decided we’d come back to it another day.
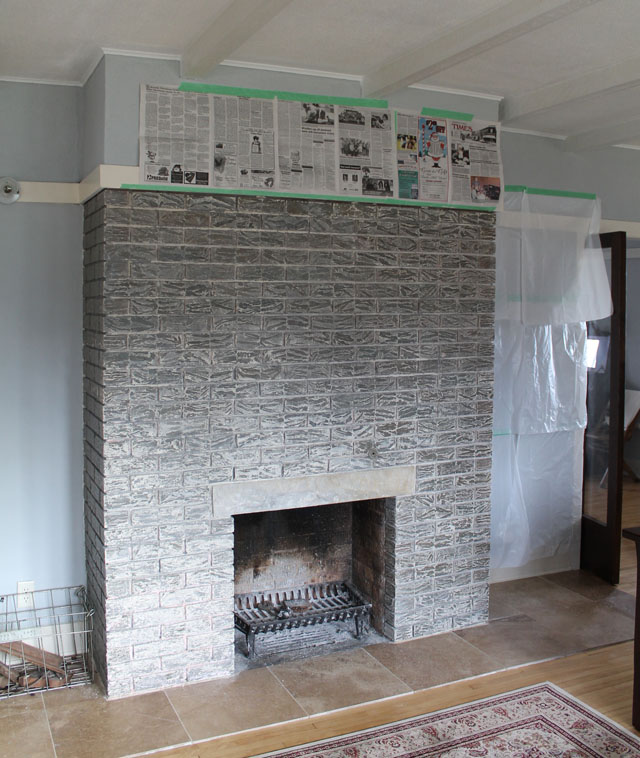
011115-stripping-fireplace-brick13The funny thing about all of this is that when you stand back, it’s kind of hard to tell that we did anything at all! I doubt that the previous owners had any inkling about the brick color when they decided to paint the fireplace dark gray. And yet their choice of color has made it difficult to discern what has been painted and what has been stripped. When you get really close to the fireplace you can definitely see the difference.
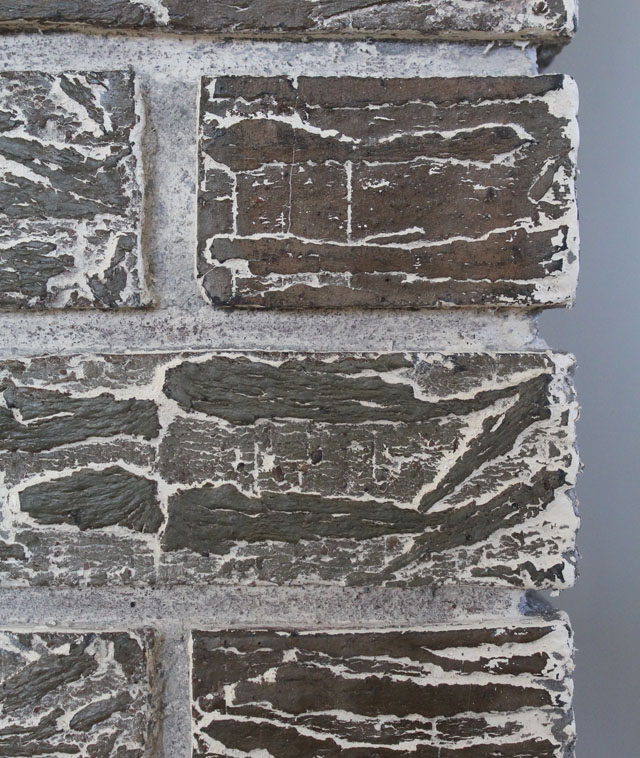
Fireplace bricks after hours and hours of scrubbingWe still have a lot of work ahead of us. We’ll need to do another pass with stripper and wire brushes on the front of the fireplace. I actually quite like the white paint that clings to the crevices of the bricks. I think it gives the fireplace a weathered look. If we can get the entire surface to look like the bricks pictured above, we’ll feel like it’s been a success.
011115-stripping-fireplace-brick11

Of course, we haven’t even started on the bricks on both sides of the fireplace. For now, I think we’re happy to pretend that magic elves will come do that part for us.

Are we crazy for having started this job? Yes, I’m sure we are. Are we happy with the outcome? Yes, I think we are. So, really, it’s all worth it in the end.

Images: This American House


Warning: Undefined variable $post in /var/www/html/wp-content/plugins/hemlock-core/inc/social_share.php on line 22

Warning: Attempt to read property "ID" on null in /var/www/html/wp-content/plugins/hemlock-core/inc/social_share.php on line 22
DIY, how to, kitchen

Replacing a Kitchen Faucet is the Easiest Plumbing DIY

10/06/2014

Replacing a Leaky Faucet is One of the Easiest Plumbing DIY Project | This American House

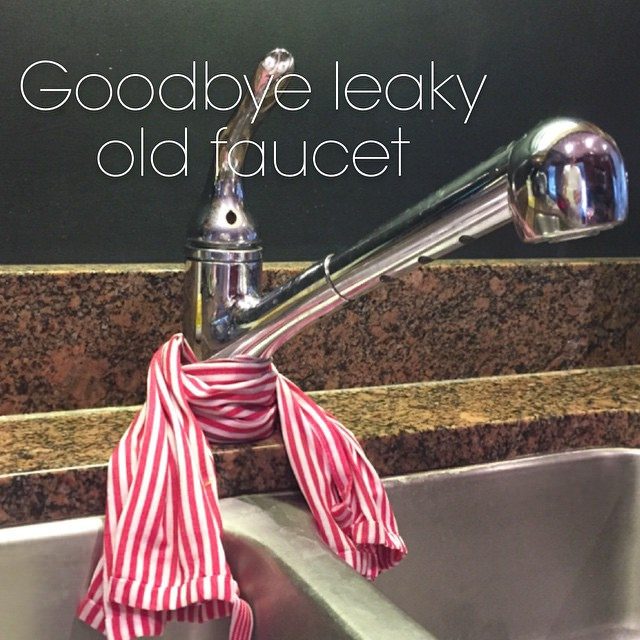
Apparently the developer who rehabbed our condo building back in the early 2000s used some of the cheapest materials he could find. Over the past seven years everything that was new in the condo has failed. Take this faucet on the kitchen sink, for instance. Within a few months of moving into our condo the faucet started leaking. Not a slow drip kind of leak, mind you. That we could live with. No, this leak came out of a hole in the back of the faucet and would slowly flood the entire counter top.

Over the years I’ve found some little fixes for the faucet but the leak would always return. And then a month or so ago the leak became intolerable. If we didn’t tie a towel around the base of the faucet, water would shoot out of the back of it and flood the counter top. The towel would get soaked but at least it would absorb some of the water and also divert it into the sink instead of onto the counter. I lived with the towel wrapped around the faucet for a few weeks but I would groan every time I saw it.

And then one day I said to The Mister, “It can’t be that hard to replace a faucet. I think I can do it myself.”

I pulled up my old friend Google and searched around for faucet replacement tutorials. And you know what? Replacing a faucet is actually one of the easiest DIY plumbing projects in the history of ever!

Replacing a Leaky Kitchen Faucet | This American House

I’ve learned my lesson from past hubris when it comes to DIY projects. Sometimes a project may seem easy at first glance but then when I’m elbow deep in grease and screwdrivers I realize that it’s not easy at all. With that in mind I watched a few tutorial videos before I finally accepted that this was a project I could tackle on my own. The video I found most helpful was this tutorial from Lowes. In fact, I was going to try to photograph my own faucet replacement so that I could write a tutorial but this video is so good that that didn’t seem necessary.

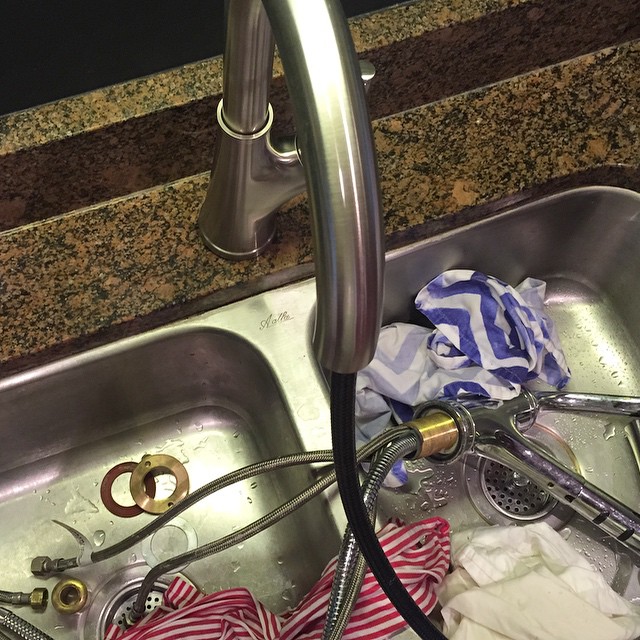
After watching that video a few times I was totally confident that this was a project I could handle on my own. And I was right! In fact, the only trouble I encountered with the project was disassembling the old faucet to remove it. Oh, and of course, it wasn’t exactly a picnic contorting my body under the kitchen sink. How do plumbers do that all day?

With the old faucet removed (and after I did a little happy dance because I wouldn’t have to deal with its leaks ever again) it was quite easy to install the new faucet. It’s really just a matter of slipping the faucet into place, securing it to the counter from underneath and then connecting the water lines. The new faucet I bought – the Cantara by Pfister – even came with a handy tool that made securing it to the counter super easy.

Pfister Cantara Kitchen Faucet | This American House

Oh, new faucet. You make me so happy! I never liked that old faucet to begin with. It was too short to be useful and the sprayer was always a bit wonky. This new faucet works like a charm and the arched spout makes it super useful.

Of course the best part of any DIY project (besides economics) is the satisfaction of knowing that I DID IT ALL ON MY OWN! Every time I walk past the kitchen sink I am filled with a sense of accomplishment. Plus, I never had to witness plumber butt during the installation of the faucet!

Images: This American House


Warning: Undefined variable $post in /var/www/html/wp-content/plugins/hemlock-core/inc/social_share.php on line 22

Warning: Attempt to read property "ID" on null in /var/www/html/wp-content/plugins/hemlock-core/inc/social_share.php on line 22
before & after, DIY, furniture

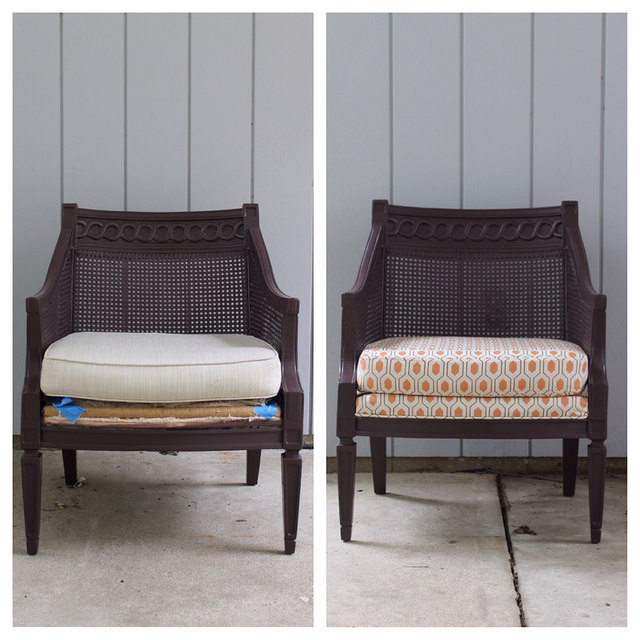
Before(ish) & After: Reupholstered Chair Makeover

08/22/2014

Before & After; Reupholstered Chair Project | This American House

On the left: a chair that has been re-painted to cover its 1980’s speckled faux wood finish. On the right: the same chair just before it left This American House with a freshly upholstered seat and cushion. Three cheers for DIY upholstery jobs!

Continue Reading…


Warning: Undefined variable $post in /var/www/html/wp-content/plugins/hemlock-core/inc/social_share.php on line 22

Warning: Attempt to read property "ID" on null in /var/www/html/wp-content/plugins/hemlock-core/inc/social_share.php on line 22